Wednesday, February 25, 2015

Altered Playing Cards


Hi all. Since I didn't have many DT projects due this week, I thought it was a great opportunity to write a post featuring a few more of my altered playing cards. These are some of my favourite things to make JFF and JFJ (Just for Joy). I always keep some prepped and ready to play with so that when I get some minutes, they are good to go.


The backgrounds are created with whatever media I have on my desk or feel like playing around with...often Neocolor II crayons, Gelatos, Big Brush pens, and Derwent Inktense blocks. I add stencilling with gesso, stamping with Ranger Archival inks, and scraps and bits left over from other projects. I have a little bin on my desk at all times where I deposit any bits and pieces that I think might come in handy for these...die cut pieces, embossed ones, off-cuts...whatever.


The images most often come from Mischief Circus collage sheets. They are sized to fit, fussy cut, and often matted on black cardstock to frame them. Stickles, doodling, and other small embellies are added to make them my own. The sentiments are printed on white cardstock, matted in black, and often popped up on foam tape. The outside edges of each card are always inked with Black Big brush pen in a loose messy way. To finish the backs, I either add heavy cardstock and trim it to fit or add a second playing card so the back shows but the card itself is two layers making it sturdier.

Thanks for stopping by today. I appreciate that. I will be posting another set of three altered playing cards later this week. I could play with these forever...lol.

Life is good; so is art.
Bonnie

Monday, February 23, 2015

Sweet Pea Stamps Facebook Progressive Challenge Part 2


Hi all. It's Part 2 of the Progressive Challenge at Sweet Pea Stamps Friends & Fans Facebook group so all those who entered Part 1 will be playing with this adorable freebie image called Love Is in the Air from Katerina Koukiotis. How sweet is she? if you didn't get a chance to play along with Part 1, you can purchase this image and still play along for Part 2.


I coloured this little miss and her heart balloon with Prismacolor pencils and a few Polychromos for shading the skin. She was fussy cut leaving a narrow white border and then matted on black cardstock and trimmed out again before being popped up on foam squares.


The background was a chunk of mixed media paper from another project. I was spritzed with ink sprays ages ago...maybe Denim Colorwash and Dylusions Vibrant Turquoise. It was also stencilled with Embossing Paste through TCW's Mini Sketch Grid template in a few places. A picket fence die was used to cut both black and white cardstock which were offset to create a shadow. A cloud die was used with the same papers and offset to create the Love cloud which was labelled with a Dymo labeller. Two lengths of green ribbon with turquoise stitching were added below the fence to make reference to grass and give Little Miss a place to stand.


To further the love theme, small puffy heart stickers were linked to the clouds with faux stitching so that the cloud was raining down love. More faux stitching was added to the white layer of the cloud. After the outside edge was outlined with a black Big Brush pen, a harlequin mat was added using washi tape over white cardstock. A black mat framed the piece and provided strong contrast to the busy harlequin pattern and colourful background.

To see other fabulous examples using this adorable image, pop over to the Sweet Pea Stamps Friends & Fans group. we would love to see what you create with Katerina Koukiotis' Love is in the Air image. Check out some of her other lovely images here.

Life is good; so is art.
Bonnie Irvine

Saturday, February 21, 2015

New Facebook contest at The East Wind


Hi everyone. It's time for a brand spankin' new contest theme for The East Wind Facebook contest. Our theme this time is "I'm ready for my close-up, Mr. deMille" AKA I ain't got no body :) We want to see head shots or close ups of the face only...no bodies needed. It's a fabulous chance to practise those face colouring skills. While there are many head shot images at The East Wind, I chose to take an image with a body and crop it so that I only had the head left to colour.


I decided to play with Lucy Loo Delivering Love. She has those awesome big eyes and I love her hat and veil. I also find the profile nose more challenging than a full on nose so it seemed like a great opportunity to practise that in larger format. I coloured Lucy Loo with Prismacolor pencils as well as a few Polychromos for shading the skin. Purple Stickles was added to her earring and white paint pen for the eye highlight. Lucy was fussy cut and matted with black cardstock before being trimmed out again. Foam squares were added to the back of the image for dimension and to create a shadow around her.


The background began with a white rectangle of mixed media paper. Plastic netting from a clementine box was layered over that and Lindy's Stamp Gang Witch's Potion Purple Starburst spray was spritzed through that. I wanted to tie the background to her veil. Some splatter dots and bubbles were stamped on the background with both Jet Black and Red Geranium Archival ink. I fussy cut a view of the earth from a very old atlas and matted it with black. I wanted to get that earth image in there to support the sentiment from Create With TLC. It was printed on white cardstock, cut with a Spellbinders Labels 26 die, and matted in black. Doodling was done around the edge and it was popped up on foam squares. It seems to suit Lucy Loo's attitude so well!


For more texture and another nod to Lucy's veil, drywall tape was cut into small uneven sections and layered behind Lucy and in the top right corner of the layout. Stars were punched from red cardstock and Xmas Red Stickles were added to them to catch the light. A Sizzix border was die cut from black cardstock and then split into two segments and added to the top and bottom of the page. A black photo corner was punched and added to the bottom left corner followed by a doodled border. Black Big Brush pen was used to line the outside edges and the entire page was matted with black cardstock to frame it.

Thanks so much for visiting today. I love that you do that. To see the other wonderful inspiration projects for The East Wind Close-Up contest on Facebook, pop over to the FB group. We would love to see you join us there for this contest!

Life is good; so is art.
Bonnie


Friday, February 20, 2015

Wink ~ New Diva Lisa release at The East Wind


Hi everyone. It's Friday which means another new release at The East Wind. This time Unky has created a Diva Lisa image called "You". I really love this character both for her joie de vivre and her spunk.


I coloured Lisa with Prismacolor pencils and a few Polychromos for shading the skin. Her gold buttons and belt buckle were added with acrylic paint both for the shine and the dimension it adds. Diva Lisa was then fussy cut, matted in black cardstock, and trimmed out again. Foam squares were added to the back of the image for dimension.


I spritzed the mixed media paper with Afternoon Delight Denim and Tibetan Poppy Teal Starburst Sprays from Lindy's Stamp Gang. This time I was successful in leaving some white space...lol. Usually I start out with that as a plan but it quickly goes by the wayside as I fill more and more of the  background.


I added some stencilling by scraping white embossing paste through TCW's Mini Sketch Grid. I like how it picked up some of the spray colours, tinting it slightly. Once that was dry, some starry washi tape was applied to white cardstock and then trimmed out. This makes the tape opaque so that the pattern is more distinct and the background does not show through. These torn sections of tape were embellished with black enamel dots.


The sentiment, from Create With TLC, was printed on white cardstock, trimmed and matted with black cardstock. The word Wink was created with Ransom Alpha Parts and was adhered with Glossy Accents. The finishing touches were the black photo corner for balance, the black matting of the page, and some black stamped scatter dots from a Joggles background stamp. I didn't even doodle a border or outline anything...clean and simple (my version, anyway) all the way. Go me! That doesn't happen very often, believe me.

Thanks for visiting today. Lisa and I appreciate your fine company. To see some fabulous creations using this awesome image, Diva Lisa "You", from others on The East Wind DT check out our Facebook group. We would love to see what you create with her, too.

Life is good; so is art.
Bonnie

Wednesday, February 18, 2015

Flowers & Bees ~ Rick St. Dennis altered trading block


Hi there. I'm here today and on the Sparkle and Glitter blog with a mixed media artist trading block. I have been fascinated with these since I first saw them. They are cubes of different sizes with five or six (if you do the bottom) slices of real estate for altering and showcasing wonderful Rick St. Dennis images. This particular one is 3.25" on all sides...I knew just what I wanted to feature, too.


I coloured all of the images with Prismacolor pencils, adding in a few Polychromos for the skin shading. The flowers are from the Clippings series: Clippings Rose B; Clippings Rose CClippings DaisyClippings Shasta Daisy. The bees are Standing Busy Bee Kid and Seated Busy Bee Kid. The flowers remind me of Alice in Wonderland's garden and the bees just make me smile. I fussy cut them all and then matted each in black cardstock trimming them out a second time. The wings of the bees were coated with Diamond Stickles for a little sparkle.


The ATBs that I purchased from Joggles came as 2 flat, scored, and cut pieces of mat board. I spritzed the good sides with Lindy's Stamp Gang Starburst sprays in Hottie Patottie Hot Pink, Marigold Yellow Orange, and Yellow Rose of Texas, also available at Joggles. The colours were allowed to blend and drip which I facilitated by tipping the mat board in different directions. I also picked up some of the over spray off my craft mat to create splotches.Great shimmer from these inks. I love being messy! Background stamping was done with some texture stamps and Ranger Magenta Hue and Brilliance Rocket Red Gold. White embossing paste was scraped through TCW Halftone borders stencil. Then the pieces were folded along the score lines, the edges coloured with Big brush pens, and the flaps glued in place to create the cube.


Originally I was going to place one image on each of the six sides but I couldn't bear to choose an image for the bottom which would be hidden. Instead I combined the two roses on the top section. Green grass was die cut and applied to the bottom of each side so the images were grounded (pun intended). A few punched flowers were added to the grass on each side and the centers were dotted with black Pearl pen. TH rub-ons were added to the bee panels. Some black splatter dots were stamped randomly on each side to finish them off.


I love this fun little ATB. The bees make the flowers happy, the flowers make the bees happy, and they all make me happy. I can't help but smile when I look at it. Thanks for stopping by today. I hope they made you happy, too.

Life is good; so is art.
Bonnie

Monday, February 16, 2015

Follow Your Heart ~ Sweet Pea Stamps


Hi there. It's time for our reminder post for our challenge at One Sweet Challenge, Sweet Pea Stamps' challenge blog. Our theme for the month of February is All About Love. We would LOVE to have you play along with us.


I chose to play with this gorgeous image by Norma J. Burnell called Be Mine. I love her stamps so much. They are intricate and tangled and so much fun to colour. I just love the detail as well as the beautiful faces. Check out that amazing owl! I coloured the image with Prismacolor pencils as well as a few Polychromos for shading the skin. Two tiny black half pearls were added to the open flowers on her head.I fussy cut the image leaving a narrow white border  to provide contrast and strength to some of the delicate parts coming off the image. Then they were matted in black cardstock and I fussy cut again. Once I finished, foam dots were added to the back of the image for dimension and to create a lovely shadow.


The background began with a rectangle of distressed green designer paper to which I added Nougat Fresco Finish paint through TCW's Harlequin stencil. This pattern was further emphasized with black scribbly outlining. Forget-me-Not Archival ink was sponged through TCW's Netting stencil in a random pattern and then more cross-hatching was added with jet Black Archival ink and an Artemio stamp. as well as a Joggles dot stamp.


To add texture to the background, drywall mesh was cut roughly and adhered in three places. Layers of  sprayed scraps were layered onto the background with the two longer ones tucked behind some vintage sheet music with a love theme. Stamping was added with Joggles Bubbles stamp and more Forget Me Not ink. Three TH rub-ons were added to these scraps to add interest and even more texture. A length of lace was adhered horizontally in the bottom right corner and was accented by a vintage button from my grandmother's stash. To help the eye move around the page, two other bits of black, a border and a corner circle were added to complete the visual triangle. Three little clips were added to the bottom left corner for balance.


The sentiment is a rather thick sticker from my stash. I coloured the white edge black and then matted it with black to give it some visual weight. Initially, I had a turquoise heart where the single pink heart is now and I didn't have the row of hearts at the bottom. It bothered me that there was so much pink on the image but it didn't tie into the background where there was no pink so I used some text paper sprayed pink to die cut four hearts. Much happier now...it makes sense because the pink is repeated in the background and runs on the diagonal through the image from each corner.

Thanks for stopping by today. I'm glad you did. When you get a minute, pop over to One Sweet Challenge blog to see the other amazing inspiration projects by the rest of this talented team. You still have lots of time to enter our All About Love challenge and if you head to the Sweet Pea Stamps shop, you will find many images you won't be able to resist!

Life is good; so is art.
Bonnie

Sunday, February 15, 2015

Altered Playing Cards


After taking a class called The Spoken Soul with Mary Jane Chadbourne a few summers ago, I became addicted to creating these altered playing cards. Whenever I have some extra time or when my mojo has gone for a walk-about, I have a play with some of these. They are so addictive and pure fun! They are also a fabulous way to use those bits of scrap paper, borders, and embossed papers that I couldn't bear to throw away.


The backgrounds are created with Neocolor II crayons, gelatos, and big brush pen. Layers of stamping, stencilling, and paper scraps add interest to the backgrounds. I often create the various layers at one sitting so I will do all of the colour on a bunch. Then I stamps and stencil and in another sitting I will addd paper and texture like drywall tape. That way I can do bits when I have time and I always have something fun to work on when I'm not in the mood to do a larger project.


The fussy cut images come next. I often have a bunch printed, and sometimes all fussy cut. I combine them with a sentiment that fits and add some embellies to finish the design. Doodling and outlining are added at this point. The final step I do is to outline the edges with black Big Brush pen in a broad messy way to frame the whole card and add contrast. They make great little pieces of art to mail off to friends.

Thanks for stopping by today. I appreciate your company :)

Life is good: so is art.
Bonnie

Friday, February 13, 2015

Celebrate Life's Little Pleasures ~ TEW new release


Hi everyone, Since today is Friday, there is a new release at The East Wind shop. It's called Diva Lisa - Hmmm Cupcake. I just love Diva Lisa. She is so cute and has the most expressive face...fun to colour! As soon as I saw this one, she was a Must-Have.


I coloured Diva Lisa mainly with  Prismacolor pencils with a few Polychromos thrown in for skin tones. Little rhinestones were added for earrings...Lisa deserves a little bling. She was fussy cut and matted with black cardstock before being fussy cut again. Foam dots were added to the back of the image and Lisa was asked to wait before indulging in her treat. Imagine!


The background started as an experimental piece done on bristol paper ages ago. I believe I used Colorwash Denim and Dylusions Vibrant Turquoise sprays through stencils but don't quote me on that. It was a looooonnnnng time ago.I finally decided to do something with my stack of experiments. I cut it to the size I wanted and then layered on some embossing paste through Dina Wakley's Plastic Canvas stencil.

The hearts were die cut from old book paper and then half were spritzed with Funky Fuchsia spray ink. The other half of the hearts I cut were adhered off-set to the pink hearts to create a little more dimension. Doodling was added to them once they were adhered to the background. Two pieces of zigzag washi tape were added to white cardstock and then torn and adhered to the left side of the background. Tiny threaded polka dot buttons were glued on top with Glossy Accents. A black photo corner with white paint dots was added to the top right corner to balance the washi tape.


The sentiment was computer generated and coloured in with gel pen. White dots were added to the coloured portion of each letter. The words were then matted with black cardstock and mounted to the background with foam dots. To complete the background, a border was doodled around the edge and black Big brush pen was used to outline the edges. A piece of black cardstock was adhered to the back and cut to form a mat. I love how that frames and grounds the piece.

Thanks for joining Diva Lisa and me today. We both appreciate that although I can't convince her to share her cupcake with all of us. To see what some of the other talented TEW DT members created with this sweet image, check out The East Wind Facebook Community group. We would love to see what you create with her, too.

Life is good; so is art.
Bonnie

Tuesday, February 10, 2015

Love is all you need ~ Rick St. Dennis art journal page


Hi all. I'm here today with a Valentine's mixed media piece using one of Rick St. Dennis' new motifs. These are so fun to colour. You could easily make it look different each time you coloured it. This particular one is called Valentine Tangle - elements digi. How fabulous would this look on a card, too.


I coloured the motif with Prismacolor pencils and added some dots with a white paint pen and black Micron. I fussy cut the image leaving a narrow white border, then matted it with a black border as well as a white one, fussy cutting in between each layer. Yep! Lots of cutting...lol. Foam dots were applied to the back of the image.


The background began as a rectangle of white mixed media paper. I was experimenting with some new colour combos of Lindy's Stamp Gang Starburst sprays so I combined Witch's Potion Purple, Autumn's Maple Crimson, and Hottie Patottie Hot Pink along with a little water. I tilted the piece every which way to get blending and drips. After drying the first layer, the background was dipped into the over-spray numerous times, drying between dunks. White embossing paste was scraped through Memory Box's Stars Starry Night stencil and allowed to dry thoroughly. The stars were outlined with a black pen.


Because I was humming the song referenced in the sentiment on the image the whole time I was creating, I had to add some torn pieces of vintage sheet music to the background. It just seemed so fitting. I smeared a little gesso over the sheet music to embed it a little but also used a Stabilo pencil to outline parts so they were on top. The image was adhered over the top with a length of cheesecloth sandwiched between the image and the background. It provided awesome texture, framed the image,  and provided a bit of white to rest the eyes from the busy piece. A white chipboard heart was stamped with some distressed dots and tucked under the image.


To finish up, a border was doodled with black pen and dotted with white to repeat the dots in the image. More of the song lyrics were added with a Dymo labeller. After adding black Big Brush pen to the edges of the background, mats of white and black were added to repeat the matting around the image as well as providing contrast and a neutral border for the eye to take a break from the busy bits.

Thanks for popping by today. I appreciate your awesome company. Be sure to check out our Progressive Challenge here on Sparkle and Glitter as well as our Facebook contest. We would love to see what you are creating with Rick St. Dennis images.

Life is good; so is art.
Bonnie

Monday, February 02, 2015

Follow Your Heart ~ Sweet Pea Designs February Love Challenge


Hi there. Today marks the beginning of the February challenge at One Sweet Challenge, the Sweet Pea Stamps monthly challenge. The theme for the month is 
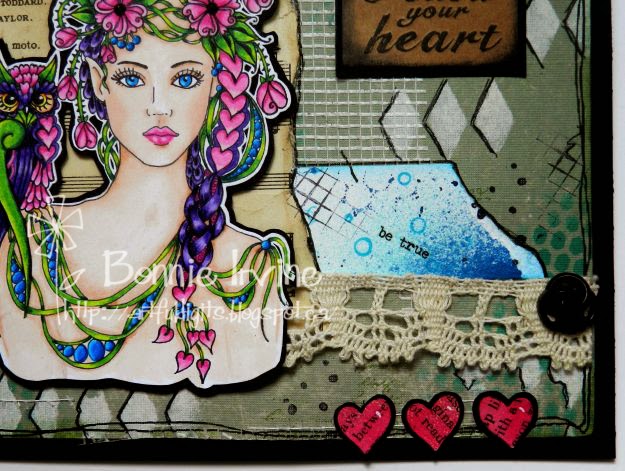
Love and the DT is posting inspiration pieces to get your mojo going. I chose to play with this gorgeous image called Follow Your Heart by Helena Reis. I love the whimsy and detail in this image...perfect to star in a mixed media piece.


I coloured  my Lady in Red with Prismacolor and a few Polychromos pencils and then fussy cut her. Isn't her flowy hair incredible? She's beautiful and so fun to colour. I popped her up on foam dots and asked her to wait for the background to be completed. She was very gracious about it:)


The background began with my usual 6x8 inch rectangle of mixed media paper. I knew I was going to spray the daylights out of it so I needed the strength that type of paper provides. I used Starburst Sprays from Lindy's Stamp Gang in a combination of Hottie Patottie Hot Pink, Hag's Wart Orange, and Marigold Yellow Orange with a tiny shot of Witch's Potion Purple. Love the shimmer and the colour-rich background these sprays give me. I sprayed and dried, and dipped in the overspray , and dried until I was happy. The little tag was created with mop-up paper...can't waste a drop!


To continue the layering, inky black gesso was splattered and dripped in a random pattern. The skinniest drips were helped along with a straw. I love the spider web effect that gives as well as the contrast between the thicker and finer drips. White embossing paste was added through TCW's Tiny Circles stencil. While that was drying, I searched my old books for a page with words of love or intimacy and found a delightful passage from a 1945 book. The passages were torn out and added to the background so that a few of the sweet phrases were visible.


Now the piece needed a little contrast and texture. Black cardstock was embossed with a hearts folder and then dusted with Treasure Silver and Treasure Gold to highlight the raised areas. Sections were torn and added to the background in three places to help move the eye around the piece. A white chipboard open heart was coloured with Old Paper Distress ink and stamped with black text before being adhered to the upper left corner. The sentiment was printed on white cardstock, torn around, and adhered to the mop-up tag. It was then matted in black, given a heart brad, and popped up on foam dots. To complete the piece, a doodled heart border and outlining were added with a black pen, three enamel dots were added, as well as black mat was added to the red rectangle to frame it and provide more contrast.


Thank you for stopping by today. My lady in red and I appreciate your fine company. When you get a chance, drop by the One Sweet Challenge blog to see the other amazing inspiration pieces created by the Sweet Pea Stampers talented Challenge DT. We would love to have you play along with us and will be back on the third Monday of the month to give you a little more inspiration for our Love theme. There is the most incredible range of image styles from the talented artists at Sweet Pea Stamps...you are sure to find many must-haves once you are there.

Life is good; so is art.
Bonnie


Sunday, February 01, 2015

String of Hearts Fairy ~ RSD Progressive Challenge Part 2


Hi everyone. We are starting Part 2 of the Progressive Challenge at Rick St. Dennis' Sparkle and Glitter blog. If you played along last month in Part One, you will have received this absolutely adorable image called String of Hearts Fairy. I absolutely love how mischievous she looks. If you didn't get a chance to play last month, you can still play this time since the image is available for purchase at Rick's Zibbet shop.


I coloured her with Prismacolor pencils and a few Polychromos for the face shading. The wings were coloured in with Pan Pastels and then Diamond Stickles was added to each line to give fabulous definition and magical sparkle. She was fussy cut and then matted with black cardstock before being trimmed again.


The background began with a 6x8 rectangle of mixed media paper so I could exeriment with a few new colours I bought Of Lindy's Stamp Gang Starburst Sprays. I spritzed liberally with California poppy Gold, Marigold Yellow Orange, and Rudolph's Nose Red allowing the colours to blend and run when I tilted the piece. I then dipped and dried, dipped and dried into the overspray on my craft sheet until I was happy with the colour and texture. A messy good time!


Since I had purposely left a few areas lighter, I randomly stamped an Artemio grid stamp with Red Geranium Archival ink. Watered down black gesso was used to make bottle top circles, gift card lines, and splatter from a tapped brush. I'm not sure who ended up with more on it, the background or me :) White embossing paste was scraped through TCW's Netting stencil for added dimension and texture.


I wanted SOH Fairy to be floating among some clouds so I adhered some cheesecloth strips where her feet would be resting. Two rusty metal hearts were adhered next to her using Glossy Accents. The letters for the word LOVE were Ransom AlphaParts with white paint dots added. Black and white harlequin washi tape was adhered to white cardstock and then torn into three lengths. Black enamel dots were used to embellish them and add shine. A punched photo corner was given white dots to echo those on the letters before being adhered to the upper left corner. A black cardstock mat was adhered to the colourful background section before SOH fairy was added with foam dots.

I must say, I love how this piece turned out with the orange-yellow background and her fabulous blue hair. Thank you colour wheel and Rick St. Dennis! And thanks to you for stopping by today. When you get a chance, pop over to the Sparkle and Glitter blog to see how the rest of Team A interpreted this fabulous image. Such talent! We would love to have you play along with us this month!

Life is good; so is art.
Bonnie