Friday, April 29, 2016

Magic~ a Sandra Caldwell image


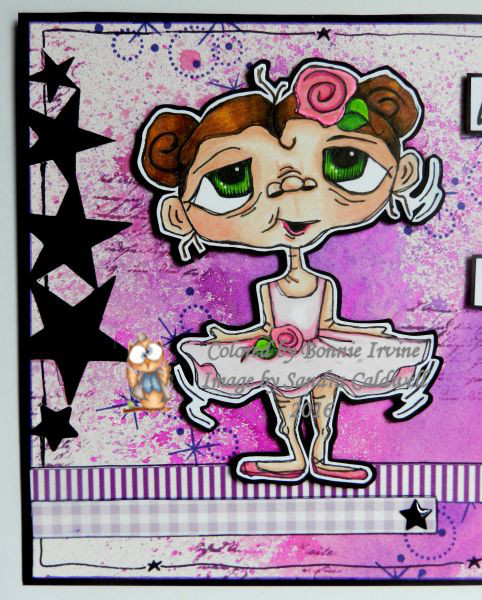
Hi all. I am a big believer in the power of gratitude and positive thinking and work each day to remind myself of its importance. It is, indeed, magic and can be seen if you believe and look for the fabulousness. This sweet little magician by Sandra Caldwell of Babycakes DND really spoke to me and became the star of this art journal page.


I coloured A LiL Magic with a mix of Prismacolor and Polychromos pencils. She was then fussy cut leaving a narrow white border, matted in black cardstock, and popped up on foam tape to create dimension and a natural shadow around her. She makes me smile which is pretty magical in itself.


The 6 x 8 inch mixed media paper background was spritzed with Delphinium Blue and French Lilac Violet Lindy's Starburst Sprays  allowing some white space to remain and tipping the page to create runs and drips. A border of tiny stars was stencilled using Deep Purple Archival Ink and a sponge. Forget-Me-Not Archival Ink was applied to Joggles Sparks Background Noise stamp and stamped several times within the frame. Black spatters were stamped using a TH stamp and Jet Black Archival Ink. White Embossing Paste was scraped through TH Dot Fade Layering Stencil to create texture as well.


The sentiment from Create With TLC was printed on white cardstock and matted with black. The open spaces in the lettering were filled in with a gel pen to pull some of the turquoise colour from the background. Foam tape popped it up. Cheesecloth was layered behind the lil magician to create the impression of magic smoke or fog. Black stars were punched from cardstock and Black Diamond Stickles was applied to each to give some sparkle. Red gems were also scattered on the background to repeat the red from her costume and add more sparkle. A simple doodled border was added next to the stencilled stars and the page edges were darkened with black Big Brush pen. To complete the page, a black mat was added to frame it.


Thank you for joining the LiL Magician and me today. We appreciate your fine company and hope that you find a little magic in your day. To see more of Sandra's wonderful images, be sure to drop by her Etsy shop. There is also a wonderful Facebook group where people share their makes and Sandra keeps us engaged with fun contests and new images.

Life is good; so is art.
Bonnie

Thursday, April 28, 2016

Bookworm Bob ~ A Bloobel Stamps image


Hi everyone. I am an avid reader...have been since I was little. I read every morning when I get up, again in the late afternoon, and definitely before I go to sleep. I also love books...not a Kindle person. I like the feel of them, the smell of them, the weight in my hands...and old books, well, don't even get me started on them. When I saw Lisa's Bloobel Stamps image called Bookworm Bob, I knew he was a kindred spirit and I wanted to make him the star of an art journal page.


I coloured Bob with a mix of Prismacolor and Polychromos pencils and filled his glasses with Glossy Accents. He was then fussy cut leaving a narrow white border, matted on black cardstock, and trimmed out again leaving a narrow black border so he would stand out against the background.Foam tape was added to the back to add dimension and create a natural shadow.


The 6 x 8 inch mixed media paper background was spritzed with Drop Dead Gorgeous Green, Tibetan Poppy Teal, and Delphinium Turquoise Lindy's Stamp Gang Starburst Sprays. Once dry, Joggles/ Margaret Applin's Vintage Correspondence stamp was loaded with Forget-Me-Not Archival Ink and rolled onto the background in several places. Stampotique's Funky Heart stamp was added to the page using Viridian Green Archival Ink. The same green was sponged through the numbers on Andy Skinner's Made to Measure stencil to create the border on the left side. A library card was printed and inked with Vintage Photo Distress ink before being layered behind Bob. To give him a place for his stool to sit, three images of old books were fussy cut and placed below him, the upper two popped up on foam tape.


The sentiment was printed on white cardstock, trimmed out and matted with black before being adhered to the background. A doodled border and outlining were done with a black pen. A scrap of text paper was cut with a notebook edge die and adhered to the right side of the page. A torn piece of corrugated cardboard was layered over that and finger painted with white gesso. Black Big Brush Pen was used to edge the page before it was adhered to a black cardstock mat to frame it.As I often do, Jet Black Archival Ink was used to add splatter dot stamping.

Thanks so much for joining Bob and me today. Bob said he would be with you right after this chapter...but I've heard that before. LOL To see more of Lisa's amazing and inspiring Bloobel Stamps images, be sure to visit her Etsy shop. She also has a wonderful Facebook group where people share their Bloobel makes and keep up with the latest Bloobel news. Hope to see you there!

Life is good; so is art.
Bonnie

Friday, April 22, 2016

New Release at The East Wind ~ Aurora Little Baker


Hi everyone. It's Friday already and that means that there is a new release at The East Wind. Actually there are two new releases because Unky created an Aurora image and a background image which can be combined or used separately. The main image is called Aurora Little Baker and she is adorable. The background image is called Love Kitchen and is a fabulous retro style kitchen scene where Aurora can bake her cat cookies.


I chose to work with Aurora alone as I wanted to create a mixed media background for her. She was coloured with a mix of Prismacolor and Polychromos pencils. She was then fussy cut leaving a narrow white border and matted with black cardstock to create contrast with the background. Foam tape was adhered to the back to give her dimension and create a natural shadow.


The background began as a 6 x 8 inch rectangle of coloured cardstock with some distressing near the edges. One of the Kate Crane Circles from the Stampotique cube was inked with Vermillion Archival ink and added to the background. A half doily and a copy of a vintage cookie recipe edged with Vintage Photo Distress ink were layered behind where Aurora would stand. White embossing paste was scraped through TCW's Mini Circles stencil in several places to create texture and blend the recipe into the background. Black speckled dots were added with a TH stamp and Jet Black Archival Ink.


Once Aurora was added to the background, the sentiment was printed on white cardstock, cut apart and matted with black. Each section was popped up on foam tape and added to the journal page. A black pen was used to draw a wobbly border that stops and starts next to the embossing paste. A tiny cat button with the shank removed was adhered to the top right corner and a blue ribbon bow was glued below his chin. To finish the page, black Big Brush Pen was used to edge the background and a black cardstock mat was adhered to the back to frame the piece.

Thanks so much for joining Aurora and me today. We didn't expect it but we sure appreciate it :) To see what my talented teamies from TEW DT have created with this image, be sure to pop by The East Wind Facebook Group where the projects will be posted throughout the day.

Life is good; so is art.
Bonnie

Thursday, April 21, 2016

Walk in the Rain ~ inspired by a Sandra Caldwell image


Hi everyone. We have been so fortunate this past week with unseasonably warm temperatures and sunny skies. Today it looks like we are going to get some much needed rain so my mixed media card is especially appropriate. As soon as I saw this adorable image from Sandra Caldwell's Etsy shop called April Showers 316, I knew I had to colour her. I love ladybugs and coneflowers...and the expression on the girl's face is too cute!


I coloured April and her friends with a mix of Prismacolor and Polychromos pencils. The three dots on the coneflower center were done with yellow gel pen to give them a bit of dimension. The image was fussy cut leaving a narrow white border including the single raindrops above her head. The pieces were then adhered to black cardstock and a barrow black border was left when they were trimmed out again. This gives the image more visual weight and allows her to stand out against the background. Foam tape was used on April, the flower and ladybug. The raindrops were adhered flat to the background once it was completed.


The background is done on a 4.5 x 6 inch piece of mixed media paper which was spritzed with Hag's Wart Orange and Hi Maintenance Magenta Lindy's Stamp Gang Starburst Sprays. A little water was added to help them blend and drip in places. Rocket Red Gold Brilliance Ink and Vermillion Archival Ink were sponged through Dylusions Letter Jumble Stencil to create texture here and there. Second generation stamping was done with Jet Black Archival and a dotty background stamp from Hampton Arts. I wanted this light so that's why I stamped off on scrap paper first.. Using the edge of an old gift card tapped into Dylusions Black Marble Paint, intersecting lines were created in a few places. White embossing paste was scraped through Dylusions Bubble stencil to create the raised circles. I love how they vary in colour as they pick up the Starburst Sprays underneath,


The sentiment from Create With TLC seemed to be the ideal message to go with April and her ladybug friend. It was printed on white cardstock and cut with an MFT die before being matted with black cardstock and adhered directly to the background. To add some detail to the open corners, photo corners were punched from black cardstock and tiny raindrops were added with a white paint pen. A border was drawn with a black pen and a black cardstock mat was added to the background to frame it.

Thanks for joining April, her ladybug, and me today. You have definitely brightened up the gloomy gray sky and brought a smile to our faces. To see more of Sandra's fabulous images, be sure to pop by her Etsy shop called BabyCakes DND. You will surely be inspired!

Life is good; so is art.
Bonnie

I

Monday, April 18, 2016

It's good to be queen ~ Joggles AJA Prompt 13


Hi there. I am behind with the weekly Joggles Art Journal Adventure prompts so I made some time to play today. Week 13's Prompt is to Illustrate a Quote. The one that I chose was from Mary Engelbreit and I used a Kate Crane stamp as my focal image. I love this stamp!!


I stamped using Jet Black Archival Ink and coloured the Stampotique image called The Queen of Everything using Polychromos and Prismacolor pencils. The dots on the image were filled in with tiny rhinestones in two shades of pink. Her royal highness was then fussy cut leaving a narrow white border and then matted with black cardstock which was trimmed out again. She was then popped up on foam tape to create dimension and a natural shadow.


The background began much as Barb's did...with a gessoed surface and Dina Wakley Media Paint applied with my fingers. I changed the colours somewhat, using Magenta, Blackberry Violet, and just a touch of Tangerine. White gesso was pounced through Joggles Ancient Ruins Stencil in a few places using a scruffy brush. It took two coats to get the coverage I was looking for because the background colours are highly pigmented and vibrant. Joggles/ Margaret Applin's Vintage Correspondence Cling Mounted Rubber Stamp was loaded with Deep Purple Archival Ink and rolled onto the background in places to create texture. Paint rings were created with two sizes of bottle lids and Dylusions Black Marble or White Linen Paint. A length of printed Duck Tape was adhered to white cardstock and then cut into a flag shape before being glued to the background to give HRH a place to stand. The triangle cut to make the flag shape was adhered to the top right corner.


To create the border, a crown stamp was applied around the edge using Jet Black Archival Ink. A black Pitt Artist Pen was used to draw the wavering lines and the circles in some of the openings. A white paint pen dotted the center of each black dot. The lettering for It's good to be was done with Idea-ology Alpha Parts dotted with a white paint pen. The letters for Queen are from a chipboard set and were outlined with a black pen. All of the letters were adhered with Glossy Accents. A crown was die cut from black cardstock, dotted with white paint pen, and given a larger pink rhinestone as an embellie. Black Big Brush pen was used to edge the page as the finishing touch.

Thanks for joining the Queen and me today. We both are happy you did that. To check out all Barb's Art Journal Adventure prompts, be sure to stop by the Joggles blog where every Monday a new prompt and project are presented. You can also join our wonderful Art Journal Adventure group on Facebook. There are a lovely bunch of Adventurers and all kinds of inspiration there as well.

Life is good; so is art.
Bonnie

Friday, April 15, 2016

Sneaky Peek - DT Post on the Joggles Blog


Taroo! Taroo! That's my Dr. Seuss type trumpet which I am blowing because today is the first Friday post for the Joggles Design Team and I was lucky enough to have the honour :) We have been working towards this for a while now and I am excited. To top it off, I was able to play with 7 of the new Joggles/Margaret Applin Cling Mounted Rubber Stamps and they are gorgeous. I love the designs which can be combined beautifully or used on their own just as well. The Joggles rubber stamps are excellent quality...deeply etched and they stamp the detail so easily and clearly.

As a matter of fact, I couldn't seem to stop at just one art journal page as you will see when you visit the Joggles blog. There is a full tutorial and step out photos for the project above and I've included a photo of the second art journal page just to show you more of these great designs. Love them!

Thanks for stopping by. See you over there at the Joggles blog!

Life is good; so is art.
Bonnie

The East Wind Challenge #53 ~ Make it 3D

Hi there. We have a new challenge at The East Wind Challenge Blog beginning today. The theme for this one is to Make it 3D. That means we want to see either layering of the image itself to make it 3D or to alter a 3D object like a box or tin or somehow make the card 3D. I chose to alter a book box because I had picked one up a while ago and didn't care for the cover.


The image I chose as the focal for my new cover is called Lucy Loo Bobbed. She was a fairly recent new release and I couldn't wait to colour her with my usual mix of Polychromos and Prismacolor pencils. She was fussy cut leaving a narrow white border and then matted with black cardstock.She was adhered directly to the finished background because I felt that with the box being handled a lot, foam tape would not be the best idea.


I liked the spine of the book which looked like brown leather and silver details. I cut a piece of Yupo paper to fit the front of the book. Lettuce, Meadow, and Stream Alcohol Inks were applied to the Yupo using a felt applicator and a few drops of Blending Solution. several drops of the Stream were also dripped onto the background to make these cool organic shapes. Silver Mixative was also dropped onto the background to tie into the spine. Joggles Nonsense Latin stamp was added to the background using Jet Black Archival Ink. Before the panel was adhered to the front using 1/2 inch Scor tape, washi tape was added to all of the edges to cover the old paper which had been wrapped around the covers. This was also done to the back cover.


To finish the details of the front, a length of rhinestone chain was Glossy Accented beside the new cover. The word Secrets was added with Idea-ology Ransom Alpha Parts which were then dotted with white paint pen.


White chipboard hearts with a resist pattern were inked with both Cracked Pistachio and Peacock Feathers Distress Inks were applied over the resist to make the pattern show. The edges of the hearts were inked with black Big Brush Pen before they were adhered overlapping Lucy Loo. On the inside of the front cover, a piece of designer paper edged and stamped with Vintage Photo Distress Ink was added to cover the washi tape and match the inside of the box.


Thanks for joining Lucy Loo and me today. To see the projects created by my fantastic teamies, be sure to pop over to The East Wind blog. We would love to have you play along with our 3D Challenge.

Life is good; so is art.
Bonnie


Wednesday, April 13, 2016

Grow a Happy Heart - Inspired by a Vera Lane Studio image


Hi there! This is another image that I have been wanting to colour and add toan art journal page. I love the quirky images at Vera Lane Studio. Janet Klein has such an awesome and distinctive style that suits my mixed media style beautifully. I am always inspired by her sweet images. For this page, I played with the girl and sun from Thinking of You and the flowers from Whimsical Girl With Florals to create this scene.


The four images were coloured with Polychromos and Prismacolor pencils. They were then fussy cut leaving a narrow white border. Black cardstock was adhered to the back of each and the images were trimmed out leaving a narrow black mat. Foam tape was added to the back of each to add dimension and create a natural shadow. A tiny black half pearl was added to the center of her flower and a dew drop was added to the center of the taller flower.


Colour was added to the 6 x 8 inch mixed media background with Ultramarine, Turquoise, and Leaf Green Brusho Crystals sprinkled onto the background and spritzed with water. By tipping the page in different directions, it allows the colour to blend and run. Once dry. White Linen Dylusions paint was sponged over the colour through Joggles Punchinella Trio 2 Ovals. Jet Black Archival was used to stamp a TH script stamp onto the background in a few places. White embossing paste was scraped through Dina Wakley's Plastic Canvas Stencil to create additional texture. A die cut cloud happened to be sitting on my table so that was added and faux stitched although a cute one comes with the set of stamps. Some of the stencilled ovals were also outlined with black pen.


To ground the flowers and girl, a length of washi tape which had been adhered to white cardstock was glued across the ground level. Two enamel dots accented the left end. A black punched photo corner was added to the top left corner. The sentiment was created from Idea-ology Big Chat Stickers matted with black. To finish up the page, black Big Brush Pen was used to edge the page before a black cardstock mat was added to frame it.

Thanks for visiting today. I hate to rush away but while I was linking these stamps, I saw a few more must-haves at Vera Lane Studio and I'm on my way back to collect them :) Why don't you visit Janet's shop and you'll see what I mean!

Life is good; so is art.
Bonnie

Monday, April 11, 2016

Out on a Limb ~ Inspired by Bloobel Stamps


Hi everyone! I have been super busy lately and still had a few images printed that I wanted to colour just for fun so I decided to make that happen. One of the images was Birdy in a Tree from Bloobel Stamps. I thought she was so cute with those bare feet and her hair blowing in the wind so she got the call to star in this art journal page.


I coloured Birdy with a mix of Prismacolor and Polychromos pencils adding dimension to her eyes with a flat black rhinestone and a black half pearl. She was then fussy cut leaving a narrow white border and then matted with black cardstock. Once she was trimmed out again, foam tape was added to the back of the image to pop her up and add a natural shadow around her.


The background was spritzed with Freaky Franken Lime, Drop Dead Gorgeous Green, and a little Tibetan Poppy Teal Lindy's Stamp Gang Starburst Sprays plus a little water to help the colours blend. It was dried with a heat tool and then stamped all over with a Stampabilities leaf and vine pattern using Viridian Archival Ink to create a forest background. Forget-Me-Not Archival Ink was applied to a TH script stamp and rolled on here and there. More vines and leaves were added in the form of die cut black cardstock clusters which were adhered to either side of the page.


The sentiment was printed onto white cardstock and each word was trimmed apart before being matted with black. They were then added to the background with foam tape. Three butterflies were punched from leftover spritzed yellow  clean up scraps and added with foam tape to repeat the yellow from her shirt onto the background. Tiny turquoise rhinestones were adhered to the tops of their bodies. A border was doodled around the outside edge before black Big Brush Pen was used on those same edges . A scrap of drywall mesh was placed in the bottom left corner and three threaded yellow buttons were adhered over it with Glossy Accents. To finish off the page, black cardstock was used to mat it and serve as a frame to draw the eye into the page itself.

Thanks for visiting Birdy and me today. We're glad you did. When you get a chance, pop over to Bloobel Stamps where many of Lisa's quirky images live. You are sure to find inspiration and several characters who want to come home with you :) And if you're a rubbah kind of stamper, see her cling mounted rubber stamps at the Joggles store.

Life is good; so is art.
Bonnie

Saturday, April 09, 2016

When I was born...inspired by a Sandra Caldwell Image


Hi everyone! I have long been a fan of Sandra Caldwell's drawing style and her whimsical images so I was super excited and honoured to become a part of her Design Team. Her images fit so well with my art journalling style and they never fail to make me smile.


For this page, I chose to feature the adorable Old Lady Ballerina which can be found in Sandra's Etsy shop, Babycakesdnd. She was coloured with Prismacolor and Polychromos pencils. She was then cut out leaving a narrow white border and matted with black cardstock because that's what I do...LOL. Foam tape was added to the back of the image to add dimension.


The 6 x 8 inch mixed media paper background was spritzed with Hottie Patottie Hot Pink and Hi-Maintenance Magenta Lindy's Starburst Sprays plus a little water to help the colours blend and run. Once that was dry, Deep Purple Archival ink was used to apply an Inkadinkado circles and stars stamp in several places. Magenta Hue Archival was applied to a TH script stamp and transferred to the background in other places, adding texture and interest to the spray inks. Two lengths of washi tape were adhered to white cardstock and trimmed close before being edged with Purple Violet Big Brush Pen. They were cut into three lengths and adhered to the sides.


The sentiment was printed onto white cardstock and trimmed into single words. These were matted in black cardstock and popped up on foam tape. A row of stars was cut out with a TH On the Edge die and adhered to the left side. Small enamel stars were added to the three pieces of washi tape to repeat that shape and scatter it around the page. A simple star border was doodled around the outside of the page with black pen and Purple Violet Big Brush Pen was used to edge the piece. To finish it off, a black mat was added to the back to frame it and draw the eye into the page.

Thanks for joining Old Lady Ballerina and me today. We are happy that you did that :) To see more of Sandra's sweet images, be sure to pop over to her Etsy store. You are sure to find inspiration and must haves. There is also a wonderful Facebook group where we share our creations and there are all kinds of contests and wonderful people, too.

Life is good; so is art.
Bonnie

Friday, April 08, 2016

Guest Design Post at Joggles


Hi everyone. I am fortunate to be a guest designer again today on the Joggles blog. This week I am playing with Joggles Mehndi Hands Collage Sheet and Lindy's Stamp Gang Two Toned Starburst Sprays...plus a whole lot more :). As soon as I saw the Mehndi Hands, I fell in love with the detailed patterns on them and there is something about hands themselves that draw me. If you looked around our home, you'd know what I mean :) Anyway, I wanted to use as many of them as I could so I ended up doing two pages created with the same steps but different specifics which was fun.


To see my two pages and the accompanying tutorial explaining my process, please pop over to the Joggles blog. There are detailed instructions and step by step photos..and chocolate and balloons and kittens and...OK, maybe not but I'd love it if you visited anyway :) Thanks so much!

Life is good; so is art.
Bonnie

Monday, April 04, 2016

Joggles Art Journal Adventure Prompt # 12


Hi everyone! Over the weekend, I had a chance to respond to the Joggles Art Journal Adventure prompt #12 which is to Use Art Cards or Tags in your Layout. Barb's original project had a black background which she spattered and then added two completed cards and two images to complete the layout.


I decided to use four of the twelve images from AdornIt's Art Play Paintables Paper - Lady Bugs as my focals. These are printed in black on white watercolour paper and are so cute!! I cut them apart and used Derwent Inktense pencils and a brush dipped in water to add colour to the images. I kept the colours consistent with all four. I also used Faber Castell Pitt pens to add doodles in the background of two of the rectangles. When completed, they were cut leaving a little more than 1/8 inches of white next to the borders. This framed out the images and allowed the details and wobbly lines of the borders to remain intact.


The background was painted black by scraping Black Marble Dylusions Paint onto the page with a palette knife.Black and white checked washi tape was adhered to white cardstock to make the white sections pop. The sections were edged with Black Big Brush Pen and adhered to each side of the page with Scor tape. The four coloured images were adhered to the open section between the checked borders.To finish the page, a square of the checked tape was placed in the center of the page between the images. White paint pen dots were added to the center and next to the checked borders. Black Big Brush Pen was used to edge the entire page.


Thanks for popping by today. To check out Barb's original post or any of the other Art Journal Adventure Weekly prompts, pop by the Joggles Blog. We also have a wonderful AJA Facebook group where people share their own responses to the prompts. It's a wonderful place to connect with like-minded individuals and to gain inspiration. Hope to see you there!

Life is good; so is art.
Bonnie

Friday, April 01, 2016

The East Wind Challenge #52 ~ Steampunk/Industrial/Metal


Hi everyone. Happy April! Today marks the beginning of a new challenge at The East Wind. For this challenge, the blog DT members use the freebie image from Unky's April newsletter. The theme this time is Steampunk/Industrial/Metal so we want to see one of these on your project. The awesome image, called Aurora "Face Only", is a little different this time as there is only a suggestion of hair. I love the possibilities this image presents...so many ways to go with her. She also has beautiful features... a great image for practicing features.


I printed Aurora on text printed designer paper and coloured her with a mix of  Polychromos and Prismacolor pencils. When she was finished, I tore around where I thought her hair would end.


The 6 x 8 inch mixed media paper background was sprayed with Witches' Potion Purple and Delphinium Turquoise Lindy's Stamp Gang Starburst Sprays both through TCW's Mini Numbers Collage Stencil and without it until I got the effect I wanted. Once dry, Aurora was adhered to the background. Black cardstock die cut gears and metal jewellery findings ones were adhered over her hair and out onto the surrounding background to tie the two together. No additional stamping or stencilling was done ...it didn't need it.


The word, Overthinking, was created with Idea-ology Ransom Alpha Parts dotted with white paint pen. A thin strip of black cardstock, a torn piece of the same text paper, a one of washi tape were used to "underline" the lettering. On the opposite side of Aurora, the same three layers were added with the black being a die cut label. Three black photo turns were added to the upper right corner and a border was doodled around the outside edge. Black Big Brush Pen was used to edge the background and a black cardstock mat was added to frame the page.

Thanks for joining the lovely Aurora and me today. To see the fabulous projects created by my talented teamies, including our newest DT member Vannessa, please pop over to The East Wind Challenge Blog. We would love to have you play along with us.

Life is good; so is art.
Bonnie