Saturday, July 30, 2016

Art Journal Adventure Week # 29 Response - Negative Space


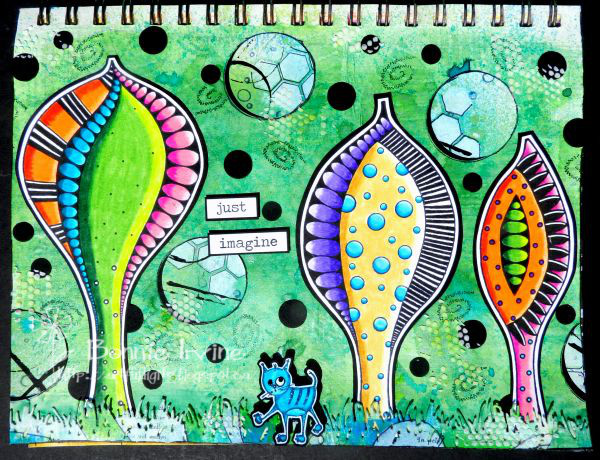
Hi everyone! Barb's prompt for Week #29 in her Joggles Art Journal Adventure series was to create a background, add shapes, and paint out the negative space around them. It's the opposite of what we often do and it intrigued me, having not done that before. I decided to feature dragonflies since I absolutely love them...and, of course, I had to change it up a little, too, 'cause that's the way I roll :)


I sprayed the page background with Lindy's Sassy Sapphire, Delphinium Turquoise, and French Lilac Violet. I then drew a dragonfly shape based on several images from the internet onto white cardstock and fussy cut it. I used that to trace around to get the three dragonflies. I then used a scribbled circle stamp and Jet Black Archival Ink to stamp the overlapping circles. And that's when I made a tactical error which I didn't notice until I took pictures in the sun. I used Dylusions Black Marble paint to cover the negative spaces but in hindsight, I should have used black gesso or Liquitex Basics. The Dylusions went shiny in some spots giving an uneven finish and I would have preferred a flat finish. Note to self...


Once the black paint was dry, I used a Medium and a Small Black Pitt pen to doodle in the dragonfly bodies and wings. The eyes were circles punched from black cardstock and doodled with a white paint pen. They were then adhered to the heads. A circles stamp was inked with Garden Patina Archival Ink and was used to add interest to the circles.


White paint pen was used to create a doodled border and Black Big Brush pen was used to edge the page to remove the distracting white edge. Two Idea-ology Big Chat stickers were added to the page and given a doodled border to tie in with the page. The background still looked to plain to me (LOL) so I added Texture Paste through TCW's Tile Texture Stencil to break up the black and add texture.

I'm so glad you stopped by today. If you haven't already been following along with the Joggles Art Journal Adventure and Barb's weekly Monday prompts, it's not too late. You can join in at any point and we'd love to have you join our amazing AJA Facebook group as well. It's a wonderful group filled with creative, friendly, and supportive people who share the same enthusiasm for this fun adventure.

Life is good; so is art.
Bonnie

Friday, July 29, 2016

Laughter - Inspired by Bloobel Stamps Images


Hi everyone! It's been far too long since I stole time to create with Bloobel Stamps images. Even though this was a super busy week, I decided that I wasn't about to let another week go by without creating an art journal page with these two fabulous images. The one on the right is called Charlie and the one on the left is called Giggles. When I found the quote by Charlie Chaplin, who has been a favourite of mine since high school, I knew I had to combine them in a project.


Both Charlie and Giggles were coloured with Prismacolor and Polychromos pencils. Both were fussy cut leaving a narrow white border and then matted with black cardstock. They were also both popped up on foam tape to create dimension and a natural shadow.


The 6 x 8 inch mixed media paper background was spritzed with Lindy's Stamp Gang Hag's Wart Orange and Hottie Patottie Hot Pink Starburst Sprays. After it was slightly dry, TCW's Elevator Gate Stencil was set on top and spritzed through with Hi Maintenance Magenta Starburst Spray. It wasn't quite big enough to cover the entire background so I flipped over the still inky stencil onto the part that was not stencilled. The letters LOL were stamped using Jet Black Archival Ink and a Penny Black Alphabet stamp set. Scribbly circles were stamped with Cactus Flower Archival Ink and an Ellen Hutson stamp called Bokeh Dots. Film strip washi tape backed with white cardstock was adhered in two pieces to form the ground line so Giggles and Charlie had a place to stand.


The sentiment was computer generated and printed on white cardstock. It was trimmed out, matted with black, and popped up on foam tape. Five enamel stars were adhered to the left side and another two on Charlie's side. Black Big Brush Pen was used to edge the outside of the background before a black mat was added to frame the page.

Thanks for stopping by today. Charlie, Giggles, and I really appreciate that. Be sure to pop by Lisa Graham's Bloobel Stamps shop to see more of her fabulous quirky images. They are sure to make you smile if not outright laugh out loud. She has the most wonderful imagination and off the wall sense of humour!

Life is good; so is art...and laughter!
Bonnie

Thursday, July 28, 2016

Sandra Caldwell Birthday Blog Hop

GOOD MORNING!
We are celebrating the very talented Sandra Caldwell's Birthday (which happens to be TODAY!)
with a birthday blog hop. Won't you please help us celebrate?!

We have each made a creation with images from her Etsy store.
If you arrived here from Cindy van Oorschot , YOU ARE IN THE RIGHT PLACE!


For my B-day card for Sandra, I used  the adorable image called Butterfly Costume 804 which I coloured with a mix of Prismacolor and Polychromos pencils and then fussy cut leaving a narrow white border. She was matted with black and popped up on foam tape for dimension.
A simple background of patterned paper overlaid with green and turquoise ribbons created a woodland feel. Three punched and layered butterflies with pearl bodies embellished the top right corner of the card and a die cut and matted sentiment was added to the top left corner. A large black threaded button and a black mat completed the card.

Here's a quick peek at the inside which was finished to complement the front design:


Sandra, the message is heartfelt! I thank you for your friendship, your inspiring designs, and the joy that both bring me. I hope you have the best birthday ever in the history of all birthdays :)

Thanks for stopping by everyone.
In case you get lost, here is your line-up.
So hop on over to Barb Poole and see her wonderful creation.
Start at the beginning
Sandra Caldwell Stamp Fans Facebook Timeline 
Holley Tondre Barnhart
MaryAnn Samuelson
Dana Gebhard Johnson
Sharon Rogers 
Laine Kammeraad-Smith
Delores Miller
Cathy Preissing
Donna Mundinger 
Elizabeth Perez-Collazo

End here and wish Sandra Caldwell a very HAPPY BIRTHDAY!
Sandra Caldwell Stamp Fans Facebook Timeline 

(Blog Candy Alert)
Have fun hopping! Be sure to leave a comment below because I will randomly choose a comment and the person leaving the comment will win 3 digi stamps of choice from Sandra's fabulous Etsy shop, Babycakes Digis and Designs. Good luck everyone!

Life is good; so is art...and birthdays!
Bonnie

UP-DATE

I numbered my comments (except for Sandra's) and then went to Random.org to choose the winner of the three images. Congrats to the very first comment writer, Donna Mundinger, who has won the three Sandra images.
Thanks to all who visited.

Monday, July 25, 2016

New Release from Sandra Caldwell ~ Enchanting Emma (766)


Hello and Happy New Week! I like Mondays because that's when Sandra Caldwell releases a wonderful collection of new releases in her Etsy shop, Babycakesdnd. It's always so fun to see what she has created and to think of the stories they have to tell. This week, I was delighted to play with Enchanting Emma (766) a delightfully sweet fairy with the cutest expression on her face,


I coloured Enchanting Emma with a mix of Prismacolor and Polychromos pencils. I added Cotton Candy Stickles to her little wings and coloured the sky with Pearlescent Blue Pan Pastel. I love the shimmer even if my camera doesn't! The image was cut in a rectangle and the corners were rounded with a punch. Black cardstock was used to mat it because I love the contrast and frame that provides.


The background, a 6 x 8 inch rectangle of mixed media paper was spritzed with Sassy Sapphire and Tibetan Poppy Teal Lindy's Starburst sprays. By tilting the background, runs and drips were encouraged. Garden Patina Archival Ink was applied to Joggles Vintage Correspondence and  Background Noise - Spark stamps so they could create texture and pattern in a tone on tone fashion. Jet Black Archival was used to apply the TH splatter dots stamp in several places as well. The image was adhered to the background using foam tape to create dimension and shadow.


The sentiment was printed on white cardstock, matted with black, and popped up on foam tape. To further the theme of flying, a large silver wing charm was added to the top right corner with a brad and some glue. Three black enamel stars were added to both the upper left and bottom right corners. I wanted to bring in those touches of black to move the eye through the page and I also thought the stars went with flying and fairies. Black Big Brush Pen was used to edge the background before it was matted with black cardstock to frame the piece.

Thanks for joining Enchanting Emma and me today. We love that you came by. Be sure and pop by Sandra Caldwell Stamps Fans Facebook group today to see the other awesome new releases she has for us this week. They are delightful and the DT will post their awesome creations with them throughout the day.

Life is good; so is art.
Bonnie

Sunday, July 24, 2016

Joggles Art Journal Adventure Week #28 ~ Cubism


Hi everyone. I have been putting off this art journal page following Barb's AJA prompt for Week 28. Barb admires the Cubism paintings of Pablo Picasso so her prompt was to create something in that style either by replicating one of his or from your imagination. This prompt was so far outside of my comfort zone that I needed to pack a lunch to get there. I was excited to try it but I couldn't even begin to get an idea of what to do so I left it for two weeks. Today, I put on my big girl panties and decided to just do it!


I pulled an extra piece of mixed media paper out of my art journal and drew the face on it, partly because I knew I had designer paper that would work for the background so I wanted to fussy cut her and partly because if I screwed it up, I could start over more easily :) In drawing the  Marlena's head (she told me her name), I didn't go as abstract as Picasso...abstract is not really my style. I did meld the two faces and created strong blocks of colour and shape as well as strong lines in the cubist style. I outlined everything with a Medium black Pitt pen, wanting my lines to be a little thicker. Once they were completely dry, I used a mix of Neocolor II crayons and Inktense pencils, activating the colour with a water brush. I wanted that kind of look rather than bold more opaque paint. I was able to shade with darker colours and used a white paint pen in a few places to highlight.


Marlena was fussy cut and the white edges were inked with black Big Brush pen. She was then matted with black cardstock and trimmed out leaving a narrow border to allow her to stand out from the background. The  designer paper comes from a stack of op art paper designs I found ages ago in the children's craft section of a store. I added a .5 inch border of black cardstock to frame the page and then set the image in place. Before adhering her, I punched three 1.5 inch black circles from cardstock and glued them in place allowing Marlena to overlap two of them. As I have mentioned before, I always like to add some text or at least a word of sorts to my art journal pages. I didn't want to distract from the simplistic style so I used glittery white stickers to say L73...a little reminder to me about the page's theme. When I was a kid, if someone called you L7 it meant you were square and the three refers to the exponent number for cubed (x3) so L73, to me, means square cubed. Yes, I know I'm a little odd :)

Thanks for popping by today. Marlena and I appreciate that. If you haven't already been following along with the Joggles Art Journal Adventure and Barb's weekly Monday prompts, it's not too late. You can join in at any point and we'd love to have you join our fabulous AJA Facebook group as well. It's an awesome group filled with creative and supportive people who share the same enthusiasm for this adventure.

Life is good; so is art.
Bonnie

Friday, July 22, 2016

Joggles DT Post ~ Sneak Peek


Hi everyone! It's my turn to post a DT project on the Joggles blog so I thought I would give you a sneak peek in a shameless attempt to get you to pop over there and check out the full project. I created an accordion book filled with layers of goodness and starring a sweet little Joggles bird stamp called Tweet Tweet. Besides wearing very quirky hats created from bits of other stamped images, all the birdies have messages for us which just might make you smile. Just sayin' ....

I had an absolute blast creating this project and would love to share more...oh that's right, I did...over on the Joggles blog. See you there!

Life is good; so is art.
Bonnie

Tuesday, July 19, 2016

The East Wind New Release - Barmaid


Hi there!Tuesdays and Fridays are the new release days at The East Wind shop and I got a chance to play with today's NR called Barmaid. I think all servers work hard for their money and have to put up with difficult customers and situations bars have maybe more of both. I love the expression on this barmaid's face. She looks frazzled and a little wistful like she is doing this job to pay the bills but has different dreams she wants to pursue. Maybe she wants to become a full time artist or run her own business. That was the story behind this creation.


I coloured Barmaid with my usual mix of Polychromos and Prismacolor pencils. The image was then fussy cut next to her leaving a narrow white border and around the bar area where it made sense to me. It was then matted with black cardstock and trimmed out again before being popped up on foam tape.


The background began with a piece of designer paper with this cityscape printed on it. It was cropped to a 6 x 8 inch size, edged with black Big Brush Pen, and matted with black cardstock. White Texture Paste was scraped through TCW Tiny Circles stencil with a palette knife to add a little texture.


The sentiment was computer generated, printed on white cardstock, and matted with black cardstock. Three tiny black gems were used for the dots between Dream and then. The first section was popped up on foam tape to emphasize it and the other three were adhered flat against the background. A black die cut arrow was adhered so it pointed to the first part of the message and a clock button was glued next to it as a reference to her awareness that time is passing to get her dream into play and also because she is watching the clock until her shift is over. Once the barmaid was adhered in place, I decided that I wanted a visual triangle of red accents with her top being one of the points of the triangle. Three red brads were added inside the open arrow and two small rectangles of red cardstock were added to fill in the base of the bridge supports. That keeps the eye moving around the page and connects the image to the background. I like that repetition.

Thanks for joining Barmaid and me today. We appreciate that! To see what others on our talented The East Wind DT have created with this fabulous image, be sure to pop by The East Wind Facebook group where they will be posted throughout the day. She will be available in TEW shop later today. I'd love to see what you create with her and what other stories she has to tell.

Life is good; so is art.
Bonnie

Friday, July 15, 2016

The East Wind Challenge #59 ~ Photo Inspiration


Hello everyone. There is a new challenge beginning today on The East Wind Challenge Blog and we thought we would try something a little different (for us) and make this a Photo Inspiration challenge. I will post the photo at the bottom of this post. When doing this kind of challenge, you can use anything that you notice, like, or that speaks to you from the inspiration photo. For me, it was the gorgeous sea colours, the stripes of the water, and the beachy feel.


I chose The East Wind image, Lucy Loo Midnight Mermaid, to star in my project. She was coloured with a mix of Prismacolor and Polychromos pencils and fussy cut directly on the lines of her body and hair. I didn't leave my usual white border, nor did I mat with black. I also cut off the waves surrounding her in the image because I wanted to create my own. She was popped up on foam tape except for the very bottom edge.


The background was created with torn strips from five different papers or cardstock. They were torn in a curvy fashion with the white edge exposed so they looked like whitecaps Each piece was layered slightly overlapping the one above until the entire background was covered. A pre-printed saying was die cut and the colour of the lettering changed to black. Black Big Brush pen was used to outline the edges before it was adhered over the waves. Shell were cut from seashell themed paper, outlined with black, and then adhered overlapping the saying piece. Small flat pearls were clustered with the two lower shells.


The bottom left corner was also decorated with a small shell image, some pearls, and hemp twine which was looped and then tied together before glue was added. The top left corner was given a photo corner punched from the same deep blue paper as in the waves. More pearls were clustered below it to complete the visual triangle. Patina Stickles were added to the mermaid's outfit to add a little magic and shimmer. The outside edges of the page were lined with Black Big Brush pen before a black mat was added to frame the page.

Thanks for popping by today. Midnight Mermaid and I appreciate that! To see the amazing creations by the rest of the Blog DT for our Photo Inspiration Challenge, be sure to pop by The East Wind Blog. We would love to have you play along with us.

Life is good; so is art.
Bonnie

Thursday, July 14, 2016

Joggles Art Journal Adventure Week # 27 ~ Stars


Hi everyone! It's another hot and humid day here so I squeezed in some playtime in my Joggles Art Journal Adventure book. The theme Barb chose for Week 27 was to feature stars...not a hardship for me since they are one of my favourite shapes both in my art and in my home decor. She also started off with a colour palette that is often my go-to: pink and orange, black, and white.


I spritzed the background of my page with Hag's Wart Orange and Hottie Patottie Hot Pink Lindy's Starburst Sprays.and let it dry a little until the puddles were gone. Then I placed Joggles Starlight stencil over top and spritzed through the openings with Hi Maintenance Magenta Lindy's Starburst Spray. Dina Wakley Grungy Stars stamps were stamped onto white cardstock with Versamark ink and then sprinkled with black embossing powder and heat set. They were fussy cut and edged with Black Big Brush Pen to frame them and get rid of the white. They were then adhered to the page with Scotch Quick Drying Tacky Glue.


More tiny stars were created on the page by scraping Texture paste through the star portion of the Joggles Punchinella Quintet stencil. They picked up some of the background sprays making them very subtle which I love.


On several of the 3/4 inch round Sticky Snippets, Jet Black Archival Ink was used to stamp a bulls-eye pattern (it's actually a flower center stamp...shh...don't tell). The Sticky Snippets were then peeled off the backing and scattered across the page. Black pen was used to outline them as well as the stars. Black Paint Pen was used to create small dots around the circles. Black Marble Dylusions paint was used to create lines using a gift card. Black Big Brush pen was used to edge the page and create a bit of a frame. The letter for the word, Shine, were Idea-ology Ransom Alpha Parts which were adhered to the page with Aleene's Super Thick Tacky Glue. White paint pen dots were added to the bottom of each letter.

Thanks for stopping by today. As much as this week's prompt was within my comfort zone, next week's prompt is so far out of it, it's on another planet. I can't wait to tackle it. If you haven't already been following along with the Joggles Art Journal Adventure and Barb's weekly Monday prompts, it's not too late. You can join in at any point and we'd love to have you join our fabulous AJA Facebook group as well. It's an awesome group filled with creative and supportive people who share the same enthusiasm for this adventure.

Life is good; so is art.
Bonnie

Monday, July 11, 2016

Smiling Sue ~ New Release from Sandra Caldwell


Hi there! I know Mondays are not everyone's favourite days but one good thing about them is that they are the day that Sandra Caldwell releases her new images and that's something to look forward to :) The new release which I played with this week is called Smiling Sue (793) and she can be found in Sandra's Etsy shop, Babycakesdnd, later today. I think she has the sweetest expression and I've been wanting to colour those Marcelle curls that I've seen others do because they look so cool.


I coloured Sue with a mix of Prismacolor and Polychromos pencils. She was then fussy cut leaving a narrow white border. After Sue was matted on black cardstock and trimmed out again, she was popped up on foam tape for dimension.


The 6 x 8 inch mixed media paper background was spritzed with Drop Dead Gorgeous Green Lindy's Starburst Spray. Joggles Bubble Blast stencil was placed over that and Freaky FrankenLime was spritzed through the stencil openings to create darker circles. Once the stencil, which was still covered in the left over spray, was removed it was flipped upside down on white cardstock to transfer all of that yummy colour. This gave the reverse pattern to what I just created. Once these two papers were dry, the white cardstock with the reverse pattern was torn and layered over the original paper on both sides. Viridian Archival Ink was used to stamp a subtle cross hatch pattern here and there and then Library Green Archival Ink was used to stamp Joggles Nonsense Latin Text  randomly. Three sizes of hearts were die cut from "mop up" paper which had also been decorated with left over paint. I keep these pieces on my desk to use for just this purpose.


The sentiment from Create With TLC was printed on white cardstock and matted with black. The two added strips of paper were outlined to make them stand out and a simple border was doodled around the edge of the page. Two punched black photo corners were added to the bottom of the page. Black Big Brush Pen was used to outline the edges and a black cardstock m,at was adhered to the back to frame it.

Thanks for joining Smiling Sue and me today. We love that you came by. Be sure and pop by Sandra Caldwell Stamps Fans Facebook group today to see the other awesome new releases she has for us this week. They are delightful and the DT will post their creations with them throughout the day.

Life is good; so is art.
Bonnie

Monday, July 04, 2016

Joggles Art Journal Adventure Week # 26 Response ~ Stripes


Happy 4th of July to all my friends in the US! 

Today I am sharing my response to Joggles Art Journal Adventure Week #26 where Barb's prompt was to use stripes. She also used the long rectangles Sticky Snippets and I decided to follow suit. However, instead of a layered painty background like she used, I decided to cover my journal page with Tim Holtz Melange Tissue Wrap which I applied with gel medium. I wanted black and white text as my background to contrast with my busy and colourful Sticky Snippets stripes.


While the Tissue Wrap layer was thoroughly drying, I played with the Sticky Snippets sheet. I had already brayered the entire sheet with three colours of Liquitex Basics acrylic paint: Cerulean Blue hue; Bright Aqua Green; Light Blue Permanent. I used my 2.5 inch brayer and very little paint which I rolled out thinly on mt craft sheet. This is a slow build up of layers and is repeated several times. Joggles Ancient Ruins stencil was placed over the page and white gesso was pounced through the openings in several places. Next, one of the wonderful designs from Stampotique Originals Kate's Doodle Cube was added to the background using Cobalt Blue Archival Ink. I also added Stampotique's Dotted Squares stamp to the Sticky Snippets sheet using Garden Patina Archival Ink. When doing the stamping and stencilling on the Sticky Snippets background, I add more than I normally would to a regular background because I know that the background will be used only in fragments and I want some of the stamping and stencilling on the individual Snippet shapes.


The 1 inch rectangles were peeled from the SS backing sheet and applied vertically to the journal page over the Tissue Wrap background. In order to vary the width of the stripes, I also used the skinny pieces which filled in between the one inch stripes to give me the skinny stripes and the top and bottom sections of the background for the wider stripes. There is absolutely no waste with these SS sheets. Black pen was used to outline the edges of the stripes to accent them. Barb featured black horizontal stripes over her vertical ones but I knew I was going to use a bird image so a branch was drawn on black cardstock and cut out. Gray Prismacolor pencil was used to draw in the bark lines and the branches were edged with Platinum Ink to highlight the edges. Birdy Shoes, another Stampotique Originals stamp, was printed on white cardstock using Jet Black Ink, He was then coloured with Prismacolor pencils, fussy cut with a white border, and matted with black cardstock. Blue Bayou Stickles was added to the dark blue section of his wing. Foam tape popped him up when he was adhered standing on the branch.


A cloud was die cut from a coffee sleeve and then the corrugated side was edged with gesso. A little extra was sponged over the center area as well. It was applied to the background with foam tape and then Diamond Stickles was applied over the top with a finger. While the Stickles was still wet, a small scrap of cheesecloth was layered over the cloud using the Stickles to adhere it. The words, Fearlessly Authentic, were created with shiny black puffy stickers for the first word, and Ransom Alpha Parts for the second. White paint pen dots were added to the letters of the second word. To better balance the page and add a little black to the left side, a .25 inch strip of black cardstock was torn on one side and then adhered slightly overlapping the first skinny stripe. Outlining was done around the tree branch with black pen and Black Big Brush pen was used to edge the outside edges of the page.


Thanks so much for joining Birdie Shoes and me today. You have brightened our day! If you haven't already been following along with the Joggles Art Journal Adventure and Barb's weekly Monday prompts, it's not too late. You can join in at any point and we'd love to have you join our fabulous AJA Facebook group as well. It's an awesome group filled with creative and supportive people who share the same enthusiasm for this adventure.

Saturday, July 02, 2016

Joggles Art Journal Adventure ~ Week 25 Fantasy Colours


Hi everyone. I made some time to play in my Art Journal Adventure journal yesterday and today. This time I was responding to Barb's Week 25 prompt which asks us to use fantasy colours  on an object. Barb featured her awesome Jurassic Leaves stamps and since I just got mine, I wanted to play with them, too. I decided to make them into fantasy trees and add a crazy blue cat to the scene.


I stamped the Jurassic leaves #2, #3, #4 onto white cardstock and coloured them with Prismacolor pencils using the brightest combinations I could :) The cat, a Stampotique Originals stamp called Gucio Walking, was done in the same fashion as the leaves, although Turquoise Stickles was added to make him extra sparkly. All images were fussy cut leaving a narrow white border and then matted with black cardstock. Gucio was popped up on foam dots and the trees (leaves) were adhered directly to the background once it was done.


The background was actually one I had sprayed for an earlier page and then decided not to use it. If I remember correctly, the page was spritzed with Drop Dead Gorgeous Green, Freaky FrankenLime, and Bells of Ireland Green Lindy's Starburst Sprays. The Joggles Big Leaves stencil was placed across the background and spritzed with Tattered Angels Iridescent Gold Spray. This gave a very subtle shimmer which my camera skills could not capture. It's very pretty and subtle in real life. Once the images were all adhered to the background, 1.5 inch Sticky Snippets circles were peeled from a sheet  decorated previously and offset with black punched circles to create a shadow. They were then scattered around the page making sure that some were slightly off the page. Black pen was used to outline the circles and help them stand out since I was using green on green.


Barb used black painted circles in her inspiration piece. I decided to punch two sizes of little circles and adhered them around the background. Another green toned background which I had done at an earlier date but was having trouble making work was die cut a few times with a grass die and then layered over the bottom of the "trees". Gucio was placed on top of the grass so his little kitty feet still showed. Stampotique Originals Dot Swirl stamp was applied to the background with Forget-Me-Not Archival Ink and again with Library Green Archival Ink. Black Big Brush Pen was used to edge the sides and bottom of the page. To break up all the green and give the eyes a place to rest, white Texture Paste was scraped through TCW's Tiny Circles in a few places.


Thanks for joining Gucio and me in my fantasy forest. I thoroughly enjoyed creating this page and loved colouring those wonderful Jurassic Leaves. Pure play! If you haven't already been following along with the Joggles Art Journal Adventure and Barb's weekly Monday prompts, it's not too late. You can join in at any point and we'd love to have you join our fabulous AJA Facebook group as well.It's an awesome group and there's always something new to see and learn:)

Life is good; so is art.
Bonnie

Friday, July 01, 2016

TEW Challenge #58 - Let 'er rip!


Hi everyone! Happy Canada Day to my fellow Canadians! And  a Happy b-day to my husband! And Happy new challenge and freebie image to all The East Wind fans:) It's a happening day! The new challenge theme on The East Wind Challenge Blog is Let 'er rip! so we want to see torn edges or torn papers somewhere on your project. Easy peasy! Because it's the first challenge of the month, all of the DT have used the new freebie which comes in the newsletter to all subscribers. This little sweetie is called Teen Lucy Ukupunk and I love her to bits!


I coloured Lucy with a mix of Prismacolor and Polychromos pencils and fussy cut her leaving a narrow white border around the image. She was then matted with black cardstock, trimmed out, and popped up on foam tape.


The background, a 6 x 8 inch rectangle of mixed media paper, was spritzed with Hag's Wart Orange, Hottie Patottie Hot Pink, and Yellow Rose of Texas Lindy's Stamp Gang Starburst Sprays plus a little water. A music note was stamped in several places using Magenta Hue Archival Ink and then outlined with black pen. Splatter dots were stamped using Jet Black Archival Ink. Two sizes of black die cut hearts were adhered around the page. To keep with the torn papers theme, Vintage music paper was torn into three sections and layered across the bottom to give Lucy a place to stand. These three pieces were also outlined with black pen.


The sentiment was printed onto white cardstock and the words were cut out individually. They were then matted with black cardstock and popped up on foam tape. A treble clef brad was added to the top right corner to further the music theme. Instead of cutting straight edges for the black cardstock mat which was used to frame the page, the edges were torn to follow the Let 'er rip theme.

Thanks for popping by today. To see the other wonderful DT projects created with this sweet July newsletter image, be sure and stop by The East Wind blog. We would love to have you play along with us. And if you aren't already a subscriber to The East Wind newsletter, you can sign up for that while you are visiting the blog.

Life is good; so is art.
Bonnie